What Makes a Photo Beautiful? Essential Composition Tips to Try
Composition is one of the most crucial elements in mastering photography. When an image is made with a purposeful structure, it goes from forgettable to unique.
Knowing what you want to communicate with your photo, how you want your audience to feel, is the first step in making memorable pictures. A photograph’s rhythm is determined by its ruling composition, and its foundations are strengthened by intentional design.
Using these classic composition tools will help you create beautiful images, and with time you will employ them effortlessly.
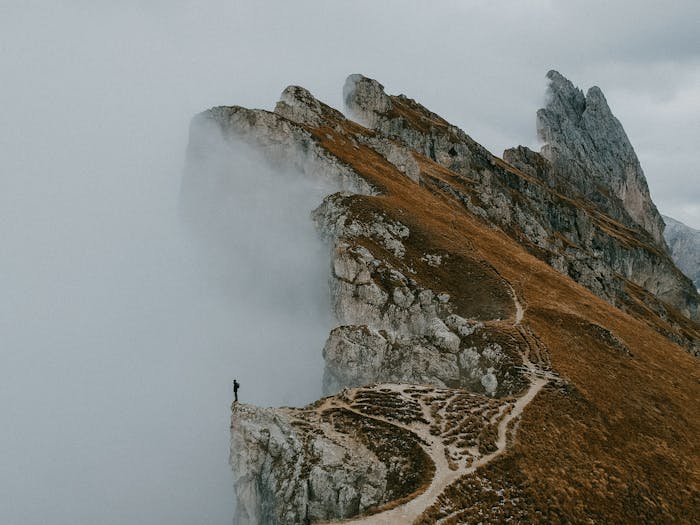
The rule of thirds in action: the hiker is located at the point where two imagined grid lines meet.
Photo by Tom Verdoot · View Photo
Experiment with the rule of thirds and the golden ratio
As you peer through your camera’s viewfinder, imagine a grid dividing your view into nine rectangular tiles created by two evenly spaced lines crossing both the length and the width of the image.
These lines will guide you to a classic composition tool known as the rule of thirds. By photographing a subject either at the points where the lines converge, or directly overlapping one of the lines, the viewer’s eye is naturally drawn to the harmony (or disruption of balance) of the image.
When you look at a photograph, what area do you start with?
You may be tempted to say the center, but people generally begin in the direction they read, starting on the left or right side depending on the language they usually speak.
This is important to understand with the rule of thirds, because you can tailor your composition to take advantage of it. Have your subject overlay a line that stretches from one side of a photograph to the other, directing your viewer to take in the whole frame as though they were “reading” it.
When you’ve mastered the rule of thirds, it’s time to try the golden ratio. At its most basic level, the golden ratio is actually an irrational number roughly amounting to 1.618. The golden ratio accounts for a logarithmic spiral that is the basis for its use as a photographic composition tool.
By overlaying this spiral on your image and matching up the points of interest with the intersecting elements, your subject will pop in a more subtle, natural way than it would with the rule of thirds, which is easy to overuse.
Try photographing the same subject using both the golden ratio and the rule of thirds, and see which composition tool better reflects your vision.
Know the difference between leading lines and paths
Lines are a powerful, dynamic composition element. You can dictate a photograph’s focal point by “leading” a viewer with actual or inferred lines in an image.
Leading lines can show a relationship between elements in a photograph, emphasize a subject, and create depth. Leading lines must guide the eye to a particular point of visual interest in a frame.
It’s important to know where you want your lines to lead, and where you don’t: mainly, out of the frame or away from your subject.
A “path,” in contrast, is usually made by equidistant lines running parallel, connecting the foreground to the background of an image by leading directly into the horizon.
Railroad tracks, roads, tree lines, shore lines, rivers, bridges, fences, buildings, or any long pathway can be used for both paths and leading lines. Even people can be used as lines: when a subject is looking towards another element in the frame, the viewer follows their line of sight.
Leading lines don’t have to converge as paths do: rather they can be horizontal, vertical, diagonal, curved, and intersecting.
Experiment using different points of view, using natural light and shadows to guide your lines, and composing intentional subjects as well as finding existing, unexpected leading lines in nature.
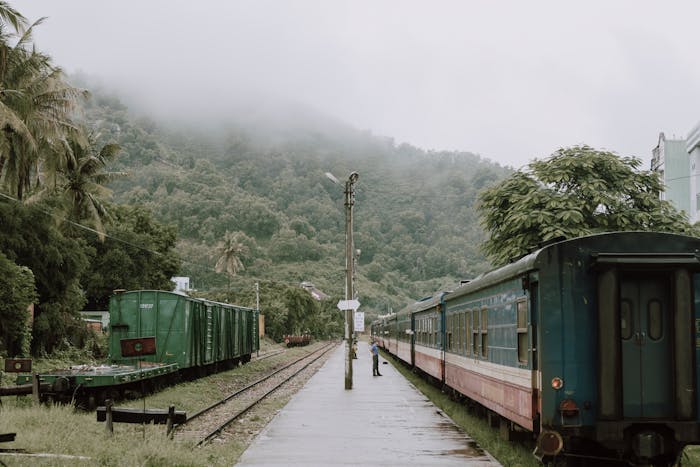
The central path in this photo leads the eye into the middle of the frame.
Photo by Streetwindy · View Photo
Create a frame within a frame
Photographing a subject within a frame is a sure way to make them truly stand out. It’s a bold, intentional technique that demands a viewer’s attention.
Decide first if you want your frame in the foreground or the background of your image. When the frame is in the background, you can control your angle of perspective and the way your subject is placed, but have less control over the frame itself.
Think of the tourists who take photographs in front of the Leaning Tower of Pisa, pretending to lift the tower upright. That’s background framing! It requires a bit more forethought in composition than foreground framing, which is simpler and often involves finding spontaneous frames to photograph through.
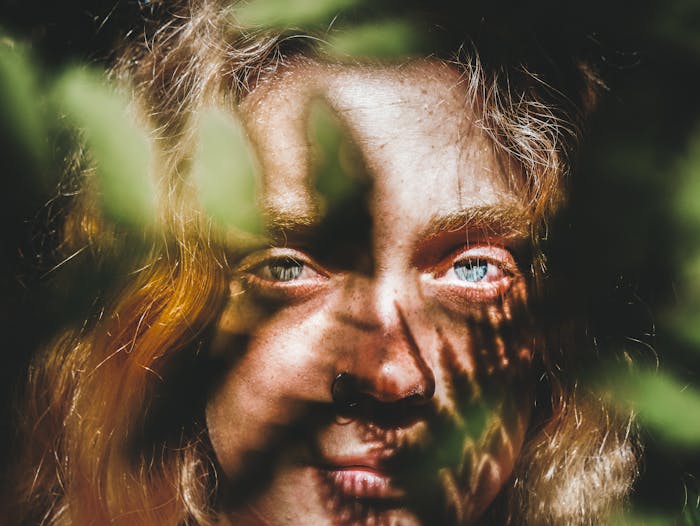
This creative use of leaves and shadows makes a frame which puts focus on the subject's eyes.
Photo by Max Ravier · View Photo
Foreground framing creates depth with a shift in perspective. The pictured frame determines a viewer’s reference point; it’s closer to the camera, and as a result the audience feels closer to that part of the image. All the visual information beyond the frame is further from the viewer, creating the depth that will define your photograph.
Your frame is equally important to your composition as your subject. Are you photographing through an ancient archway, or the iron curves of a park bench? Through a break in the trees, or between long shadows at dusk? Are you placing your subject between two distant mountains?
Take as much time to determine the frame in your composition as you do the subject.

This shot combines framing and negative space for a powerful effect.
Photo by Jeffrey Czum · View Photo
Make use of negative space
Creative use of space in photography can draw out strong reactions in a viewer. Have you ever seen a photo of a crowded subway car and felt a little claustrophobic? Or felt the loneliness of a single subject alone in a frame, surrounded by emptiness?
The choices we make regarding space in an image can have significant emotional impact if they are made with intent.
Put simply, positive space is your main subject, and negative space is the area surrounding your subject, often left unoccupied. Intentionally using negative space in your composition can create drama and perspective, and when paired with other composition techniques such as those listed above, can result in an unforgettable photograph.
Negative space should be considered just as important and interesting as your main subject in photographs where it is used as a primary composition tool. In such images, the main subject(s) are often placed on the periphery of the frame, while the remaining negative space both creates visual interest and pushes the viewer’s eye to the subject(s).
Your negative space doesn’t have to be completely devoid of other details, but a successful composition will feature those additional elements as simply part of the image background, without drawing attention from the main subject.

Negative space doesn't have to be only black or white. Here, the brick wall creates an interesting space in the composition.
Photo by Inga Seliverstova · View Photo
In conclusion
Mastering these composition techniques will significantly advance your photography skills. Try using more than one in a single photograph to truly make your subject shine.
Being intentional in what you want your photograph to communicate is the first step of making these tools work for you—the rest is practice and devotion to your craft. Get snapping!
Cover photo by Tyler Lastovitch.
Written by Maggie Andresen · Jun 02
Maggie Andresen is a freelance documentary photojournalist and reporter based in Rwanda, covering East and Central Africa.